If you ordered Office as part of your DaaS order, Green Cloud will mount an ISO to your utility server. This ISO will contain the ISO files for Office 2013/2016 32/64bit of the version (Standard or Pro) that was ordered. Copy these files to a share on your utility server that is accessible by the DaaS desktops. Once the copy is complete, please notify Green Cloud so we can dismount the ISO file from the utility server.
The installation process is the same for both static and dynamic desktop patterns. The installation will be done using commands to call the Office Customization Tool and create an installation file. Below are the steps to install office. Note: Do NOT open any office application in the pattern. You can safely install updates to Office products but do not open any application. If you do open an Office application in the pattern, you will need to rearm Office prior to resealing the pattern.
Install Instructions
- Log into the gold pattern as a local admin.
- Browse to the shared location of the Office ISO files.
- Mount the version you wish to install.
- Cancel the auto run if it starts
- Open an elevated command prompt and change to the location of Office
- Run exe /admin
- The administrator configures the following settings in the OCT:
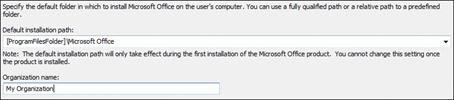
- Setup > Install location and organization name: Type My Organization in the Organization name field:
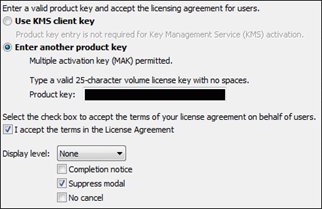
- Open Setup > Licensing and user interface.
- Select the KMS Also, select I accept terms in the License Agreement for all users. Change Display level if you wish to view the installation progress.
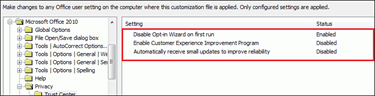
- Open Features > Modify user settings > Microsoft Office 2013 > Privacy > Trust Center:
- Enable: Disable Opt-in Wizard on first run
- Disable: Enable Customer Experience Improvement Program
- Disable: Automatically receive small updates to improve reliability
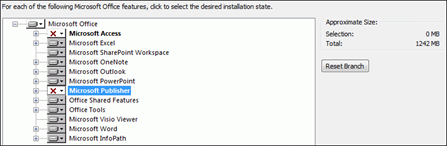
- Open Features > Set feature installation states.
- Select the Office Applications to install. Only install what is necessary to conserve storage space. :
- Open Additional content > Add registry entries.
- The following registry entries will be used to automatically configure the User Name and User Initials for Microsoft Office for each user.
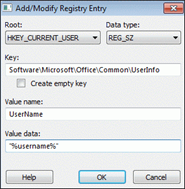
- Click Add and fill the Add/Modify Registry Entry form to create the following two entries:
- The following registry entries will be used to automatically configure the User Name and User Initials for Microsoft Office for each user.
Caution! Using Registry Editor incorrectly can cause serious problems that might require you to reinstall your operating system. Green Cloud cannot guarantee that problems resulting from the incorrect use of Registry Editor can be solved. Use Registry Editor at your own risk. Be sure to back up the registry before you edit it.
User Name
- Root: HKEY_CURRENT_USER
- Data type: REG_EXPAND_SZ
- Key: Software\Microsoft\Office\Common\UserInfo
- Value name: UserName
- Value data: %username%
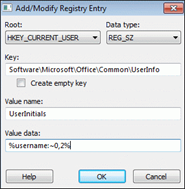
User Initials
- Root: HKEY_CURRENT_USER
- Data type: REG_EXPAND_SZ
- Key: Software\Microsoft\Office\Common\UserInfo
- Value name: UserInitials
- Value data: %username:~0,2%

- Save the customization file to the network.
- Open an elevated command prompt and change to the location of Office
- Run exe /adminfile <path to admin file>
- Confirm Office installed
- You should see new programs under the Start Menu.
- You can also check Programs and Features under the Control Panel.
- Rearm Office
- Open an elevated command prompt and change to the install location of office.
- Install location will depend on version installed.
- %installdir%\%Program Files%\Microsoft Office\Office15.
- If you installed the 32-bit edition of Office 2013 on a 64-bit operating system, %Program Files% is the Program Files (x86) folder.
- At the command prompt run exe
- Confirm the rearm succeeds. The following message displays: Microsoft Office rearm successful.
- Install location will depend on version installed.
- Open an elevated command prompt and change to the install location of office.
You have successfully installed Office on your gold pattern. You may now reseal your pattern and build a new or refresh and existing pool.